SV Pilgrim - 1979 Morgan 382 - Homeport: Beaufort, NC

Sunday, August 23, 2015

New Companionway Drop Boards

Rare is the boat project that can be completed in a single afternoon. 

Pilgrim's tired, teak drop boards.
Pilgrim arrived in Beaufort with three teak companionway drop boards.  The existing teak drop boards are both too thin, between ½” and 5/8”, and too short.  Due to the inadequate size, the boards would bind up unless extreme caution was employed when removing or installing them.

The solution?  Two new ¾” thick King Starboard drop boards.  Since the Starboard does not require painting or varnishing, the project fit neatly into a couple hours…
  • Lay out the proper dimensions.
  • Rough cut the Starboard with a circular saw.
  • Using a router, create a rabbit joint between the upper and lower boards.  Set up the joint to shunt water outside the boat.
  • Using flush trim and round over bits in the router, finish the edges of the boards.
  • Install the hasp.


Pilgrim's new Starboard drop boards.

The new boards slide easily in and out of position.  Unlike the top of the slider or the exterior companionway step pictured above, the new drop boards will never require refinishing. 

We plan to replace all the exterior teak in the image above… in due time.


Sunday, August 16, 2015

Painting Ice Box and Engine Beds

We chose to use Alexseal Epoxy Primer and Alexseal Premium Topcoat for the engine compartment beds and surrounding  hull.  Why the Alexseal? 
  • We used the same system on the interior of the new ice box and are very pleased with the finished product. 
  • The Alexseal system will create a durable, glossy, easily cleaned surface. These attributes are desirable in both the engine compartment and the ice box.
  • We need to paint the seam along the aft wall of the ice box. Using the same paint will allow us to tackle both the engine compartment and the ice box project at the same time.

I know it’s been awhile since we mentioned the ice box rebuild (Ice Box Rebuild Photo Album).   We completed the fabrication of the new ice box last spring.  Painting the seam along the aft interior wall remained unfinished.

Seam along the aft wall of the ice box is prepped and ready for primer.

Building up the Alexseal epoxy primer "wet on wet" creates a stronger bond between the layers and eliminates sanding between coats.  How to reach the aft end of the compartment without marring the still tacky primer? 

The lower engine compartment ready for primer.

I experimented with painting the aft area via the cockpit locker and quarterberth access panels, but this proved too awkward.  My solution... leave the tops of the engine beds for another round of painting and place a piece of ¾” plywood across the beds.  This created a stable, albeit slightly angled, platform above the curing primer.

3/4" Plywood painting platform atop the engine beds.

Using this system I applied four coats of primer…

Four coats of epoxy primer complete.

The primer must cure for a minimum of 3 hours between coats.  The four coats of primer when on over a two day time span. The primer must be allowed to cure for 24 hours and then sanded before the top coat application. 
   
When using a brush to apply top coats a 24 hour cure time followed by sanding is required between coats.  The sanding generates unwanted dust so the area must be cleaned and wiped down in prep for the next coat.  Applying the two top coats occurred over a four day time span.

The finished product... a blank canvas on which to begin the engine install.

The top of the engine beds still require some primer and paint.

The top of the engine beds will be painted along with the interior face of the ice box lid.  The ice box lid is still under construction, but the ice box interior is looking good.

The interior of the new ice box is ready for divider & shelving installation.


The next step on the ice box is to install the vertical divider and the shelves.

Saturday, August 8, 2015

Painting Engine Beds and Surrounding Hull - Part 1

Somewhere in Pilgrim’s past a previous owner did a poor job of applying oil based paint to the engine beds and a portion of the surrounding hull.  Removing the paint with a heat gun and paint scraper would be the best case scenario.  Since we are discussing good old boat project the best case scenario failed.  


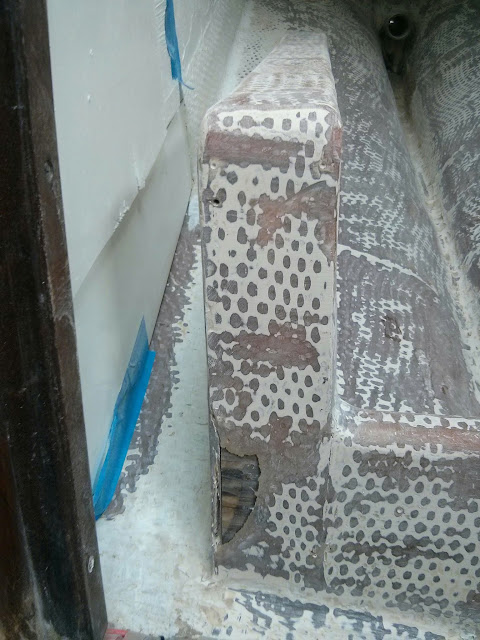
Masking the engine compartment in prep for grinding after failing to remove the paint with heat ans a scraper.

The two somewhat bare areas between the beds in the image above mark my attempts to heat and scrape. The effort resulted in gouges; strands of woven-roven mat tearing away from the hull; and paint left in the low spots. 

What next? 

Mask every opening, see images above and below.

draping plastic sheeting across the engine compartment access in an effort to contain the dust.

Suit up.
 
Plug in the grinder and shop vac.

Crawl under the plastic and into the engine compartment with the power tools.   

Generate vast amounts of dust while sweating out gallons of fluid.

On round one I succumb to the heat after sanding the aft half of the area.

The aft portion of the engine compartment hull completed in round one.

For round two, the next day, I rigged a box fan to pull air and dust out via the locker under the helm seat.  By the end of round two all the grinder accessible areas were completed. Everything the grinder was unable to reach… outboard of the beds and the narrow area along the centerline… required hand sanding.

Round three, four, five... multiple 60 to 90 minute sessions of hand sanding with 40 grit paper stretched out over a couple days.  The initial session taught me to wear leather gloves when driving 40 grit sandpaper.   

Majority of sanding completed.

The grinding and sanding revealed a couple areas requiring some minor fiberglass repair.

De-laminated area along forward, starboard bed removed.
Crack in fiberglass mat along forward, port engine bed.
I was able to repair these issues in a single session of epoxy work

Few layers of 1708 cloth covered with a single layer of finish cloth.

While working the area, I noticed the irregular texture and pitch of the center line caused water to pool in a few areas.  No time like the present to address this issue.

Fairing the center line to allow for proper water drainage.

Using tropical hardener to allow for a thick lay up in the summer heat, I mixed up a batch of epoxy thickened to a honey consistency.   This mixture was poured into the center seam near the stern.  With only some minor coaxing from a spreader, I allowed the thick fluid to find its own level.  Once the epoxy began to kick, I laid a single layer of finish cloth across the top.

Once all the repair work was completed the area receive a thorough cleaning with Tri-Sodium Phosphate (TSP).

Engine beds and surrounding hull ready for the first coat of primer.

The area is now masked and ready for primer.

See our Repowering Photo Album for images and notes current progress.


Monday, August 3, 2015

Refinishing the Engine Compartment Overhead & Walls

The best illustration I could find of the existing paint in the engine compartment is a dated image (old drain manifold, hole from original engine raw water intake on port, refrigeration lines feed into ice box, and no bulkhead separating the engine compartment from the cockpit locker).

Old image of Pilgrim's engine compartment that illustrates the need for repainting the area.

The image does do a good job of illustrating the dingy, tired paint on the walls; a lack of paint overhead, and the poor quality oil based paint applied to only a portion of the hull. 

We decided to take a top down approach to painting the engine compartment.  We began with the overhead and vertical side walls.  Most of the surfaces required only minor prep work… TSP wash down followed by two rinses with fresh water.  The overhead was previously lined with decaying soundproofing material.  The sound proofing was easily removed. The steel sound proofing mounting tabs were epoxied to the overhead.  The epoxied tabs quickly succumb to a hammer and old chisel.   The forward, interior of the cockpit foot well (see brown area in image below) was also covered with sound proofing material.  Unlike the overhead this section of sound proofing was glued to the boat.  The heavy application of contact cement proved very stubborn.

State of Pilgrim's engine compartment prior painting.

Rather than engaging in a prolonged battle to excise the old glue, we fabricated a plywood panel for the area.  Once again we reused sections of the original salon aluminum angle for mounting the plywood panel.  The plywood has the added benefit of allowing us to easily mount wiring, electrical components, hoses, etc.

Overhead and side walls of engine compartment painted.

We plan to install new sound proofing material on the two port access panels, the starboard access panel, the forward access panel, and the overhead.  The sound proofing will be added once all the other dust producing projects are completed.


See our Repowering Photo Album for images and notes current progress.

Saturday, August 1, 2015

Back to Producing Dust

Our recent progress with installing electrical and plumbing components really inspires me to continue work on those systems, but some items remaining on our project list require grinding inside the hull.  Grinding inside generates awful gelcoat and fiberglass dust.  Despite our best efforts at masking the fine dust always finds its way into the rest of the boat.   Thus, we really need to complete all the projects that require grinding inside the hull, prior to installing additional electrical, plumbing, or mechanical parts.

What is on the get the grinding done list?
  • Repair some detached fiberglass mat on the engine beds.
  • Paint the engine compartment and beds.
  • Relocate engine exhaust thru-hull.
  • Tabbing modifications and repairs to area around steering quadrant.
  • Install mounting platform for new, below decks autopilot.
  • Paint locker under helm seat.

We plan to start with the painting the engine compartment.

Thus far in our refit we have used the forward cabin for storage of cushions.  Other than removing a depth transducer we have completed no interior work in the forward cabin or anchor locker.  There are dust generating, messy projects forward (anchor locker modifications, tabbing between bulkheads and deck, etc.).  Since this area is relatively easy to seal off from the aft portion of the interior, we plan to address this area at a later date.

With respirator and grinder in hand, I’m off to generate some dust.